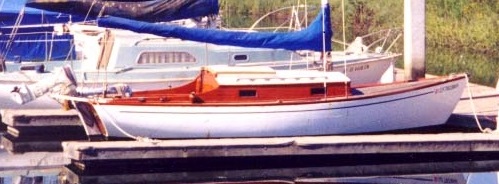
Upon delivery of Nada Bear we finally got a chance to look her over. The inside was jam packed with equipment that needed removal. Everything was damp and since this was late December not much was going to dry out. During the first weeks of January 2010 we removed all the stuff inside. It was real interesting to find items I left in the boat when I sold her.
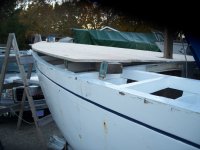
The excitement slowly faded as I saw what was left behind. The plywood making up the bunks was de-laminating, all the interior paint was peeling. Walking around the deck I noticed most of the wood plugs (bungs) were missing as well as caulking. On the bow section the deck was so soft I felt I would fall right through. There was no question, The deck had to be replaced.
Sometime around March I started deck removal. I used a hole saw to drill out the four corners of each section between the carlins and deck beams. Then to the trusty Saws All to connect the holes. By now I realized the plywood under deck was completely de-laminated. I was able to pull the deck pieces off the frames with my bare hands. This also made it easier to remove the fasteners. I could also see areas where the deck had been repaired in the past. I replaced the plywood sub deck on the port side admidship during my stewardship in Redwood City. This was the only part that was in good shape.
After a few weeks I got the deck removed. As in any project the scope tends to expand, the cabin had to come off since the cabin sits on top of the deck. I tried to unbolt the cabin and pry it up with wedges, no go. Back to the good old Saws All. Naturally the plywood under the cabin sides was in pretty good shape. I was able to find a punky section to start the saw blade through. So I proceeded to cut through wood and bolts and anything else holding the cabin on. After a few hours of work the cabin was free. With the help of a few buddies, I got it back to my garage. This is where the photos below start. I don't tend to photograph the removal process of a project.
Click on the picture for enlargement and to view the captions.
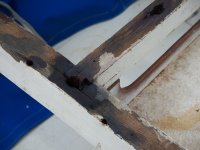

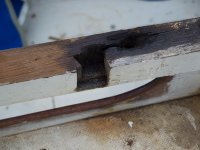


As you can see from the pictures above there was a lot of work repairing holes, lost wood, all in all I replaced about half a dozen deck beams. My procedure for repairing the iron sick holes is as follows:
- Remove any non wood material from the hole. I often use the UnScrewUm's for this. I may enlarge the hole a little to remove crumbly wood.
- If the hole goes all the way through, plug the bottom of the hole with a bung (plug).
- Using a bulb syringe inject some Clear Penetrating Epoxy Sealer (CPES) to fill the hole. As the CPES soaks in refill the hole. Do this for about half an hour or until the wood stops absorbing the CPES.
- Wait overnight, Maybe two nights. Remove the plug if used. Using Oak and Teak Epoxy, glue dowels or sticks into the holes.
- Again wait overnight, Sand flush the top of the hole, blow out the sawdust. Fill the hole with Fill-It.
- The next day, or two or week, (I wish I could do this full time) sand flat the beam, Coat with CPES to seal the rest of the wood and get any other areas that might be thinking of decaying.
- The next day apply a coat of primer.
Sounds like a lot of time time doesn't it? This was 2010 and I had a lot of time but litle money due to the economic conditions at the time. Then again the alternative to taking my time was to replace everything or do a half assed job that will not last. Actually its not all that bad. Looking at the pictures you;ll see that I did the work in sections. One day I would do #1 and 2 and 3 on a couple of items in an area. Then I move over to an area to do # 4. Then I would go to another section and do # 5, then another section for # 6. Rotating the project like this keeps it from becoming boring and allows refining of the process.
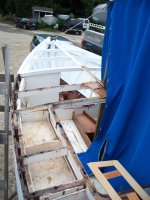
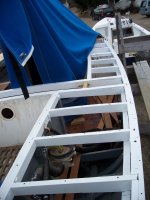
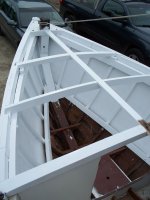
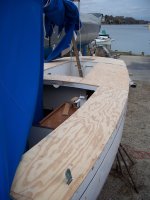
After all of the work described in the procedures above, here is the framework ready for the decking.


The pictures below chronicle the fabrication of the new deck. The weather by now started getting cool. Must have been around October when these pictures were taken. I believe in painting all surfaces of wood weather they will ever be seen or not. I one had the opportunity to rebuild the cockpit deck of a boat named Seraffyn. When I removed the old deck I noticed the underside of the teak deck planks was varnished. I thought that interesting. After looking over more of the boat I realized that was the quality throughout. It explains a lot of the well founded condition the boat was in.Check out the boat and owners travels in the link and you'll see what I mean.
Back to Nada Bear.
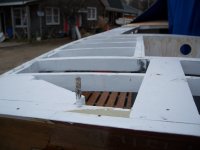
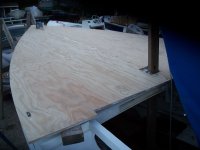
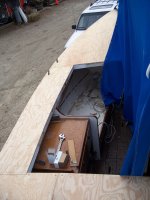
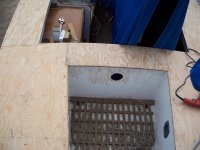
The painted surfaces shown are the underside of the deck. The bow section was longer than 8' so I scarfed in another triangular section to the forward section. Treated both halves with CPES, then Primer, then interior paint. Its easier to do so now than to crawl up into the bow to paint later.before heading to the boat I cut the center line scarf. At the boat I laid a piece of plastic sheeting over the center beam so the deck doesn't glue to it. The deck pieces were screwed together along the scarf joint. In order to keep a tight scarf, the outer edges of the plywood was blocked up to make the plywood as flat as possible. After a couple of days the LayUp and Laminating Epoxy cured. At this point I removed the fasteners along the center line and removed the plastic under the fasteners, then reinstalled the fasteners. The deck was then fastened to the deck frames starting from center line outboard to the hull sheer plank. Finally the plywood was trimmed to the hull.


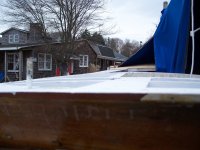
Subsequently the side deck pieces and the aft of the boat went in. All joining surfaces were scarfed and glued with a backing plate. Again the underside was pre-painted. Finally the whole deck was sealed with CPES, imperfections filled with Fill-It, and a light coat of fiberglass added using about a half gallon of LayUp and Laminating Epoxy. After cure the whole deck was sanded, and painted with two coats of High Build Epoxy Paint/Primer to fill the grain of the fiberglass weave and make a waterproof seal. After more sanding I finally put on a finish coat of Interlux paint.
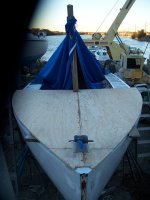
Finally winter was closing in. I made a frame to go over the open cabin hole to keet the rain out while I did the reinstall of the deck. I used the same frame under the tarp. This frame kept the weight of the northeastern snowfall from falling into the boat.
The bow reconstruction took almost all of 2020. Luckily with the Covid lockdown early in the year I had time to do the bow reconstruction. During the summer one nasty summer pop up storm, I took refuge inside the boat for the twenty minuets or so.
Looking around I noticed water pouring over the inside of the planking from the deck shear strake seam. This answered the nagging question of why the planking was decaying as fast as it is. So I became determined to make putting a toe rail on the boat as soon as the bow was done.
I left the shaping of the new wood of the bow repair for later so I could focus in the toe rail. Since it is mid October at the time I knew I only had a month to pull this off.
I started by picking up a 10' long board of Honduran Mahogany 1 1/2" thick and wide enough for 13 strips. I proceeded to rip the 12 strips about 1" wide. The toe rail would take up 6 pieces and the rub rail the other six. I actually had leftover for shorter rail items but as you'll see not quite enough.
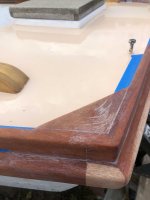
Milling the rail was rather straight forward.


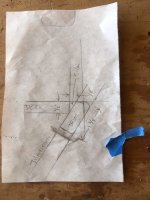
Here are the shapes of the milled lumber. The toe rail was left square on the top. This allowed specific centering of the fasteners during installation. The taper is the inboard side of the railing. The rub rail has a rounded drip edge on the bottom. This keeps rain water from running down the side of the hull. Once the lumber was milled, I cut the 8:1 scarph on the ends of the center pieces and one one of the aft and forward ends. Making sure to label the scarf joints so to avoid confusion during gluing. Since the overall length of the glued rails will be about 21', I decided to glue them up on site. I've seen folks try to glue them up on the boat during installation. It never works. The scarph wouldn't take the bend and either break or look horrible. I glued these rails up on a 16' staging plank. Sorry but for some reason I didn't photograph the process.
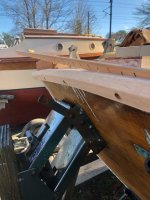
The toe rail is to be an extension of the hull over the top of the deck. The angle at the bow is different from amidships and the transom area. Before installation I marked off every 1' interval from the bow and scribed the bevel on a strip of wood noting each location for the bevel on the hull. Then I transferred the bevel to the bottom of the toe rail and planed the rail to match the bevel.

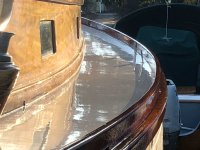
Here are the pictures of the toe rail being installed.


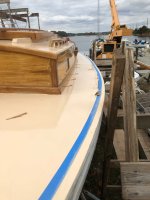


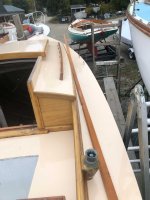
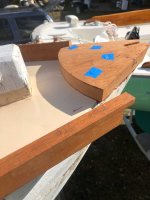


Once the toe rail is installed the rub rail gets installed. I had to bevel the rub rail at midline due to the shape of the hull. It only cut into the drip edge a little. Since by now were in early November time was of the essence and we didnt stop for photos. The transom was rather interesting. The rub rail was easy but there was a space where the plywood of the deck wasn't beveled out to the angle of the transom. So I had to insert a triangle shaped of wood to fill the gap. Finally a day of shaping and sanding the whole thing.
I did get pictures of this:


Now all thats left is to apply the finish. By now its November 22 and the tempreture is dropping. First I apply a coat of CPES to seal the wood. Then I applied four hot coats of Bristol Finish Traditional Amber. I finished the brightwork on November 29 2020.


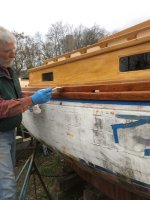


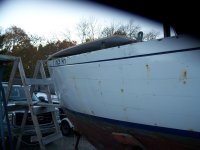
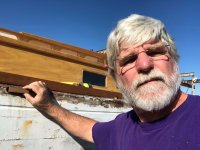
A blast from the past. Thirty years ago I hauled out at San Francisco Boatworks and did a paint job that I covered earlier on this web site. Here is what thirty years does to a person. Same boat, same person. I still have the same red T shirt.

Now winter is here and its time to cover the boat and start on the interior work.
- You are here:
-
Home

- New Deck